
 I've been hearing a LOT about HDR imagery lately. It's easy to look at a lot of photographers HDR work and not take it seriously because of how edited and fake it looks.
The truth of the matter though, is that HDR allows a photographer to show the world exactly as their eyes see it. A camera can only capture a very small range of light, causing some areas to be too dark, when exposed for the bright areas, and bright areas to become whited out when exposed for the dark areas. Unlike your eyes, camera technology does not allow for a huge range.
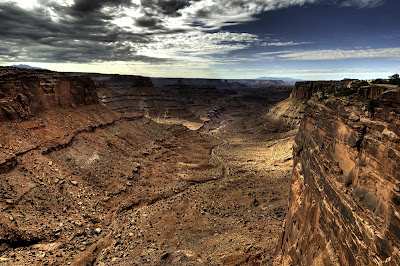
It is possible to create a very realistic image with extremely high dynamic range, in post-processing. Thanks to these new technologies, I was able to capture the HUGE range of the varying light cast in Canyonlands, UT. To capture a shot like this you first need to bracket your exposure. Most cameras will have this bracketing option. I will usually set my camera to a 7 image bracket, this way I have lots of range to work with. You must also use a tripod and make sure it is very steady. I use a remote to trigger the camera to guarantee no shake between images. Be sure to keep the same aperture and ISO throughout all exposures, and only vary the shutter speed.
Once the photos have been captured, the magic begins. I first do my RAW adjustments to the best looking exposure from the seven I captured. Then, using lightroom, I sync those adjustments with all of the other images. The program that I prefer for an HDR merge is called photomatix. This program works Significantly better than photoshops "merge to HDR" feature. It also comes with a plug-in that allows me to select my exposures and use lightroom's "export" feature to change the file types to TIF's and perform the merge through Photomatix. After the program has worked its way through the files, it should automatically open the "tone-mapping" dialog within photomatix. Don't be scared when the image opens and looks terrible. This is just what the program has created with it's auto adjustments. The biggest change that will determine if the image looks real or like a painting, is called "light-smoothing." I usually choose the 2nd button from the right to create a real image with a very large range. The farther left you go, the more the image will look surreal and like a painting. I also adjust "highlight and shadow smoothing", and "strength." The adjustments I make will vary depending on the image. There is a default button on the bottom, so if the adjustments you have made are making the image worse, you can always click that and start over.
From there, I will save the final file, and open it in photoshop CS4. These adjustments will also vary depending on image, but I will usually perform a curves adjustment, sharpen the image, and apply the image in Lab Color mode as discussed in my post below.
Get out there and make the ordinary look extraordinary with HDR!!


0 comments:
Post a Comment