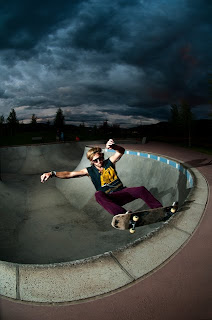
I've been getting a lot of good feedback on this image in my Flickr account, and wanted to explain how to capture a shot like this.
First and most importantly, you will need to find an extremely talented skater and a great location. This image was captured in a bowl at the Edward's, Colorado skate park that is about 11' deep with several feet of true vert. The athlete is dropping in on the wall you can see in the back of the image. He then wraps around the bowl and up the side at an angle, leading into his grind where the picture is taken. Knowing all of this information helps to determine the best and safest camera angle, and where to position my lighting gear.
My best advice for the photographer trying to shoot a sport they don't know much about: watch the athletes hit the features they like. Then ask them to show you the tricks that they think look the best, or what they can consistently land. Specify whether you are looking for air, grind, flat tricks, or just smooth riding. If the athlete is confident in the stunt, and willing to do it more than once, have them show you it a few times so you can establish your angle. It's never good to try and shoot a sport until you are 100% sure of the athlete's full maneuver. You don't want to be hit by them, or cause them to have to bail mid-stunt.
This image was captured a little bit after sunset, creating the dark overall feel. My favorite shots come from when the sky is cloudy in spots, but clear near the sun. When this occurs, the sky is very colorful, and the clouds give some dimension to the image.
You can see where the flashes were positioned by the shadows that the athlete cast. I knew the athlete's knees would be bent upwards, so a low flash would cause shadows to cover most of his body. That's why the main athlete fill light was set about 6 feet high. Then, to create a bit more dramatic look and light up the bowl behind the subject, I placed a second flash far off to the left side and somewhat behind the athlete.
A general rule to follow: the farther to the side or behind a subject you place the flash, the more dramatic the look. The 2nd flash positioned more behind the athlete was set to be slightly more powerful than the front light. This is why the left side of the athlete is brighter than the front. I set my camera to F/4.5, ISO 250, with a shutter of 1/200th using the Nikon 10.5mm F/2.8 fisheye. If you are shooting skateboarding, than an ultra-wide lens, and a fish-eye are the two most important lenses you could own.
At this point in the athlete's maneuver, he is not moving very quickly because he loses most of his speed coming up the wall. This is why a shutter speed of 1/200th worked well. An even slower shutter speed could have worked because the athlete is lit almost completely by flash, and not by ambient light. This makes the speed that the athlete is captured equivalent to your flash duration.
Experiment with different flash placement, and you will eventually get the hang of it. Amateur athletes are generally more than willing to spend a lot of time working with you to make sure you come up with a great shot. Always promise them copies of their images that they can show their friends, post on facebook, websites, or show potential sponsors. Remember that they are not just working for you, but you are working for them as well.


1 comments:
Nice post, thanks for sharing!
Post a Comment