When starting as a photographer, I feel most people believe that you shoot the photo, and the job is done. I know this is what I used to think! The only time this could possibly be true is if you are shooting in JPEG mode. What about when your shooting for clients who require RAW images converted to TIF files? Simply capturing the photo with your camera is just the start of the work. You will now need to perform your RAW conversion (covered in an upcoming article) and your adjustments in Photoshop. Make note that sharpening is always the LAST step in your editing process. Otherwise re-sizing the image, or changing anything after sharpening can cause damage to the image.
There are many methods to sharpen an image, but only two that I will regularly use. Combining the two is sometimes the best option, so try them both! Perfectly sharpened images will make a huge difference in your portfolio, and give you a leading edge over most other photographers!
Method 1 (High Pass Filter):
Like always with sharpening, perform all other editing before applying. This needs to be drilled in or you won't yield great and consistent results. SHARPENING IS THE LAST STEP OF ANY EDIT!!
First create a copy of your original layer by pressing (CMD+J on Mac, CTRL+J on PC). Then navigate to Filter>Other>High Pass Filter. Your image will turn into a gray color with some etching of the edges placed in it. A slider will pop up as well, and you will see that when you move it left to right, these etching's become more defined with color starting to appear. Find the spot where there is almost no color appearing (usually about 1.8-2 pixels) and press enter.
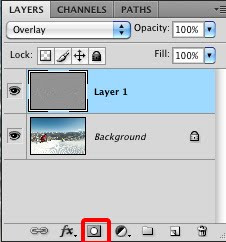
Navigate to your layer's palette (shown below) and change the blending mode (highlighted in red) to overlay or soft light, this is a good place to experiment and view how each blend mode change's the outcome.
Here's the part that will push your work beyond other photographers. Noise is introduced when sharpening is applied. But if you take your high pass filter layer, and desaturate it, you will not add nearly as much noise. This is especially helpful if you have a lot of sky in an image. Make sure your high pass layer is selected, and press CMD+U on Mac, or CTRL+U on PC. The hue/saturation menu will pop up. Take the Saturation Slider and move it all the way to the left, removing all color from the image and press enter. You may not notice much change, but it will make a difference.
When most photographers sharpen an image, they sharpen the image as a whole. This can ruin the sky with a very grainy look, and draw the viewer's attention to the wrong parts of the image. The eye is naturally drawn to the sharpest part of an image. Why would you want to sharpen an intentionally blurry background? It's very easy to selectively apply your sharpening!
Make sure your high pass layer is selected in the layer's palette, and click on 'new layer mask' at the bottom of the panel (highlighted below). Now select the mask that was applied to the image (white box next to the high pass layer) and press CMD+I on a Mac or CTRL+I on PC. This will invert the mask and block the high pass layer (See why it's called a mask? It's hiding the layer from your eyes).

Now choose a paint brush with a soft edge, and make sure it's set to paint white. Set your opacity as desired depending on how much sharpness you want to come through on each particular area. Paint the areas you desire to be sharp! If you zoom in a bit you will easily watch the sharpness take effect. Cool, huh?
Now flatten your image by right clicking in the blank part of the layer's palette, and choosing 'flatten image'. Your done! Unless of course you want to add the method discussed below as well.....
Method 2 (Smart Sharpen):
Here's the method that I use most often for my images, and it's quite a bit simpler than the high-pass filter. This is my generic go-to for sharpening. The best thing about this method, is that is automatically applied to the lightness channel of the image. What this means is that the adjustment is only applied to the image while it is unsaturated. You won't see this take effect as it is happening in the background, so it will remain fully in color.
As I mentioned above, it's best to selectively sharpen your images. You will almost never need every pixel of an image to be sharpened. So take a few extra seconds, and only apply it to the parts of the image that need it the most. This will save you extraneous noise.
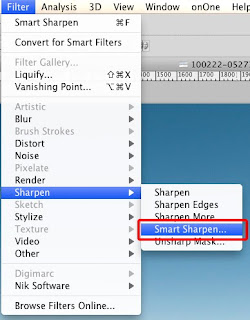
To do this, first create a copy of your background layer (CMD+J on Mac, CTRL+J on PC). Navigate up to Filter>Sharpen>Smart Sharpen. In this window there is a preview box that will show you what the effect will look like when applied. As a photo nerd I alway's get really excited to see how sharp my image will look! Something about sharpness is so cool!!

The panel that comes up has several options, with the top two being your most frequently adjusted. You will also see that you can save your settings for a quick apply to other images. This can save time in the future, but you will want to have some experience first since most images require different adjustments. I'm not going to dive into the advanced menu here, but experiment with that after you have learned the default through and through, and see how you can apply sharpening to highlights or shadows differently.
The slider on the top is a percentage slider that will determine how much sharpening is applied. The one on the bottom determines the radius at which the affect is applied. Whether it's applied to every pixel, or distributed more between pixels. I like to keep the pixel slider relatively low, and push the percentage up a bit higher. Experimenting with these is the only way to find out what looks best to you. The lower the pixel radius, the larger the percentage needs to be to show the effect.
You will see a menu below these sliders that shows 'gaussian blur', 'lens blur', and 'motion blur'. Change these settings depending on the image. If something is moving fast and is slightly blurred, choose motion blur, and rotate the angle to match the motion, then selectively paint that subject with a mask. You will see the instant change it creates. On almost all images, however, leave the setting at gaussian blur, and only deal with the top two sliders.
When you have determined that the settings are exactly how you want them, press enter to apply your smart sharpen to the top layer. Now it's time to mask the layer as discussed (in more detail) in method 1. Create a new layer mask, click on the mask, and press CMD+I on Mac or CTRL+I on PC to invert it. Choose your paint brush with white as the color, and began painting sharpness into the areas of the image that need it.
After this is finished, right click in the layer's palette, and choose flatten image. The image is now sharpened and complete!
There are numerous way's to sharpen an image, but I have found these two to work the best. Enjoy!
I would like to thank Daniel Milchev at www.photovenom.com for teaching me the high-pass sharpening method, and for his help explaining how to use Smart Sharpen. Check out his work and prepare to be inspired!!
That's the BUZZ for Today! Please check back soon for more!


3 comments:
Thanks, I have been looking for a good description of how to sharpen. Most other tutorials are quite vague. Thanks!
Thanks a bunch!
Absolutely fantastic tutorial in very easy-to-understand language!! It has completely changed the way I do my post-processing!
Very much appreciated!!! :)
Post a Comment