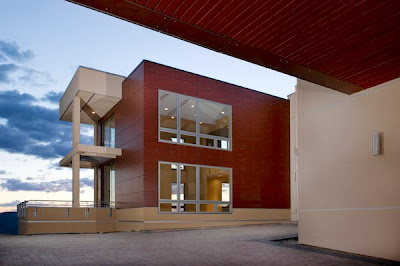
(After Dodge and Burn applied + lens correction)
One of the tools I've used and learned to love, is the Dodge and Burn tool. (It's actually two tools but they work the same.) If you don't have CS4 or above, you probably won't want to mess around with this one. The older versions of photoshop don't have the "protect tones" feature and really will mess up a great image.

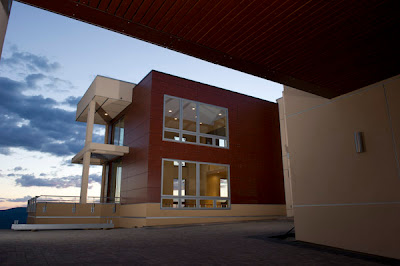
(Before Dodge and Burn + Lens Correction)
Here is what the tool looks like when right-clicked to reveal both functions (we won't be working with the sponge tool today):
These tools actually come from the day's of the darkroom (yes, the darkroom did exist......). Use the dodge tool when you want to brighten things up. Make sure the "protect tones" checkbox is selected, you will never want that one to be turned off.
The selection for highlights, mid-tones, and shadows needs to be adjusted. Look at what you want to brighten, and determine which of these applies. Most of the time you will be working in either shadows or mid-tones. Choose a low opacity, say 8-10%, create a duplicate layer with Command-J or Ctrl-J and select the size of the brush that will work best.
Now it's time to go to town and start brightening up the details. Remember that every time you run the brush over a spot, it will become brighter, so try to evenly paint similar areas. The reason you created a new background layer, is so that you can lower opacity when your done (if needed) and can also remove the layer all together if something goes terribly wrong.
When your happy with all the dodging, it's time to move onto the burn tool, this performs just the opposite of the dodge tool and darkens the areas painted. First select the burn tool, now create a duplicate layer with Command-J or Ctrl-J and select the size of the brush that will work best. Make sure "protect tones" is checked, and choose a low opacity. Maybe 6-10% with this tool.
The selection for highlights, mid-tones, and shadows needs to be adjusted. Generally with this tool you are darkening either the highlights or the mid-tones. Shadows almost never need darkening by this method.
When you've "burned" everything as much as you wanted, slide the opacity of the layer down and choose an opacity that won't look overdone. Your image should look drastically better if done correctly. It takes time to get this right without being too splotchy looking.
These tools take a bit of practice, but can push your images to the next level! Experiment and have fun!
That's the BUZZ for Today! Please check back soon for more.


1 comments:
I'm an amateur photographer of many years. I would love to someday sell my photos, but for now am still learning. I find your site easy to read and understand, brief and to the point, and all in all VERY helpful. Thank you.
Post a Comment