

I realized the other day that due to the off-season (too much snow for any summer related sports, and not enough for winter sports) that I hadn't shot for over a week. That's a long time to be away from a camera. I was really missing it. So my answer? Call up a close friend (pro skier: Matt Luczkow) and shoot some portraits.
Matt is a great person to shoot with. He loves to spend as much time as possible experimenting with different flash setups and lighting, and rarely becomes bored. These are rare finds because a lot of people have no interest in photography and get bored easily if your spending time experimenting with flash settings.
The whole point of this shoot aside from capturing some great images was to practice some more lighting setups. Practice makes perfect and the more you practice, the more comfortable you will become when you've landed a client and the pressure is on.
It's a lot of fun to step away from the uncontrolled environment of extreme sports photography, and head into a controlled studio. Makes for far less variables and is more comfortable. It also allows you time to setup and control every single source of light.
Don't have space for a studio setup you say? Well... neither do I.... kind of... I moved my couch, chair and coffee table, and hung my $89 white muslin backdrop (switched to a black one later) over the drapes in my window. Re-arrange your house a bit and I'm sure you will find a way to fit in a makeshift studio for the day.
If you don't have something to hang a backdrop from, here is a sweet kit for $194 that has a stand, and white/black backdrops. Sure, more space would be spectacular, but I at least had enough to setup all my flashes and soft-boxes.
There were a few different setups that I tried, and I will explain each one below the picture that was created using that particular setup. Lighting can be tough and takes a lot of experimentation. Challenge yourself to come up with several different setups in a shoot. It's too easy to just shoot one that consistently works and always yield similar results. Diversify.
For the image above (cigar image). I set up a B1600 at full power on a backlight stand aimed at the backdrop. This is to fully white-out the backdrop and add a little wrap around glow as well. Notice the highlights that help define the sides of the face. This flash was in SU-4 mode which means it automatically pops when any other flash in the room goes off. I used this for all setups so that I would only have to radio or cord trigger one flash.
I placed a B1600 at 1/16 power to the top and right with my 30"x40" softbox, as you can see in his eyes. Below that on the right was my ringlight set at 1/4 power. The ring light gives that great round dimple in the bottom of his eyes. The ring light was triggered with my PW's. Placing the lights to one side added more dimension to his face, and the softbox helped wrap the light around to evenly illuminate. The flashes were both about 5-6 feet away from him and he stood about 6 feet in front of the background.
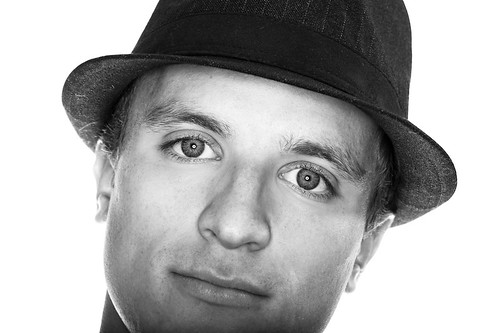
For this image I chose to shoot with a modified clam shell look. A clam shell is when your main light sources are in front of the model with one above camera and one below. For this image I had one B1600 above the camera and slightly right of the model giving the hat some depth. I then had my ringlight low and centered and shot through it. This puts the ring lights catch light in Matt's eyes perfectly centered. I still had the backlight set to full power since this was taken on the white backdrop. Power settings were the same for the other flashes as in the previous image.
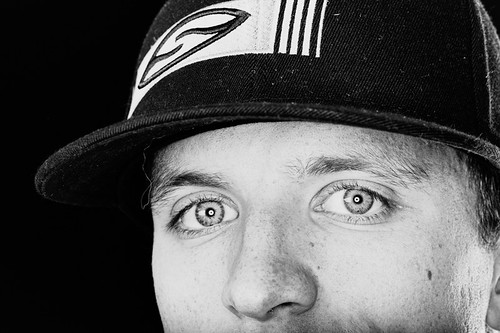
Matt's eyes are the key focus in this image. To accent them I again shot through the ringlight as evidenced by the catchlights. You'll also notice a slight box to the left of both eyes which is my softbox mounted on my B1600 to the left to add a bit more depth. On the right of the image you'll notice a highlight. This was meant to accent the hat and the side of his face. This is provided by a B1600 set to 1/2 power in a 60" shoot-thru umbrella. It's positioned far right and back so that it doesn't contaminate the side of his nose with extra light. Alway's watch out for that because it can ruin an image. There is no backlight aimed at the backdrop since I wanted pure black.
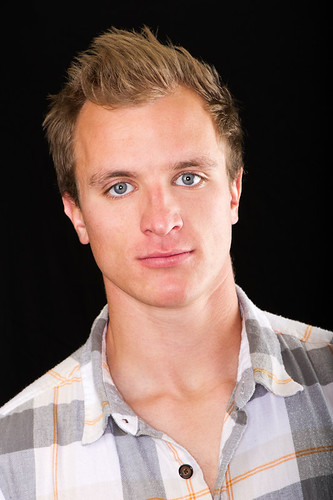
For this final image I wanted a simple and soft look. I used the same settings as the previous shot but moved my umbrella flash a bit farther forward to wrap around the face more. I also shot through the ringlight and was about 5 feet farther away making for a smaller catchlight. This is a great and simple setup and works well as a go-to when all else is failing.
All images were shot at f/16, 1/250th, and ISO 100. This provided solid focus on all details. Shooting studio work is great because you can really nail your focus. These images at 100% reveal great and extremely sharp detail in the eyes.
If you have some great images that you captured just for fun, please share them on flickr in the All Photo Buzz Group and give us a link in the comments below.
-Nikon D3S
-Nikon 105mm f/2.8 macro
-Nikon 50mm f/1.8 (very affordable!)
-Backdrops
-PocketWizard Radios
-60" umbrella (highly recommended and only $30!)
-AlienBees B1600's
-AlienBees lighting stands
-AlienBees softbox
-AlienBees BR-400 Ring Light


0 comments:
Post a Comment