
Showing posts with label biking. Show all posts
Showing posts with label biking. Show all posts
Thursday, August 19, 2010
Shoot Video! My first experiences...
Last night I went and really tested out the video capabilities of my D3s for the first time. Shooting video is so much fun, but is actually a lot more different than what I had initially expected. First off, it's got a few similarities to photography, which helps quite a bit. Then, there are the differences, which can be very tough to understand/figure out at first. The main difference being the entire approach to the shoot. For photographers who spend days setting up a single photo, this should be no big deal. But if you generally fly by the seat of your pants, you are in for a surprise with video!

Wednesday, October 28, 2009
Anatomy of an Image #2

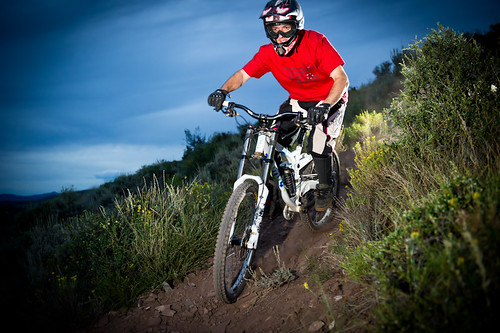
This image is actually very simple to setup and make. The first and most important detail, is to find a corner that has fairly good natural light on it. You can tell by the shadow under the biker that the sun is providing a lot of light for the image, and that it was captured towards the middle of the day. To freeze the action, I set my camera up to it's highest sync without going into FP sync mode. This way I have more power to work with from the strobe, which in the case of this shot, is a Nikon SB-800 powered by a quantum battery pack for super fast recycle times. The flash is placed just out of the left side of the frame, and because I knew the rider would be leaning inwards, is set on the ground. If you raise the flash, you lose some of the accent lighting on the bike frame, and right leg of the athlete. It was also placed low, since I was shooting at almost ground level. The closer you get to the action, at a lower angle, the more aggressive a biking shot will become. Set the flash at about 1/4 power to blend well with the pre-existing natural light. I also put it far enough in front of the rider, to catch and light his eyes. For midday, the lighting is already harsh, so throw the flash zoom at about 70mm or more, to give it more punch. Send the rider through once and test your light output. You can also have the rider stand on the corner and test. Pre-focus on the spot where the rider looked most aggressive and tilted before each shot.
This shot was captured at ISO 125 with an aperture of f/5.6. It helps secure focus, and darkens the background to shoot with the aperture a little more closed.
Thanks to Kyle Green for hiking a bit to get the shot.
Wednesday, July 15, 2009
Downhill biking photo shoot in Keystone for Cavan Images (Article is below pictures)


The start of a typical day photo shoot involves a lot of preparation. The night before I will make sure all my gear is charged and ready to go, print model releases, pack extras of everything including my camera, gather my bike gear or whatever sporting gear I need for the shoot, and clean my sensor and lenses. On top of that, I have to call up all of the athletes, tell them to wear bright clothes with minimal logos, and explain what I will be aiming for throughout the day. The next morning I wake up early, get a good breakfast (otherwise I won't be able to shoot for long in the morning) and race to the meeting spot with the athletes.
Here is a list of the typical gear I will bring to a day shoot of biking:
- Nikon D300
-(2) Nikon SB-800 Flash Units
-(2) Quantum Turbo 2x2 battery packs
- Nikon 80-200 ED f/2.8
-Nikon 50mm f/1.8 (my favorite lens, sharper than any other)
-Nikon 10.5mm f/2.8 fisheye
-Nikon 12-24mm f/4 wide angle
-(3) pocketwizards
-Nikon D200 (for backup)
-Several memory cards ranging from 4GB to 16GB (all high-speed)
-Circular Polarizing Filters
-LumiQuest Softbox 3 (close-up lifestyles)
-Extra batteries
-Dakine Sequence Backpack
-Tamrac adventure 9 backpack
When I meet up with the athletes, I let them know that I will be in their faces all day like paparazzi, but to keep their interaction with the lens to a minimum. I want the riders to act like it is just another day of riding. This allows for more realistic lifestyle shots. I shoot from the second I meet with everyone, until the last second we are all together. By doing this I create a story of the day from beginning to end. On this particular shoot I captured a total of 1,075 images! An amazing amount of diverse photos from one shoot!
On a shoot like this I would estimate that I pull my camera out of my pack over 250 times. It's just too risky to ride rocky, steep trails with my gear hanging off my neck. All of that zipping/unzipping sometimes will get to me, but by the end of the day I always have remembered why I love what I do.
Once we reach the top of the lift, the action begins. I ride ahead of the athletes and scout locations that will make great shots. I look for big berms, jumps, vistas, unique terrain features, and any unique scenery near the trail. When I find a spot, I quickly walk around it viewing all angles. Once I have found one that I am happy with, I decide if I need flash. If I do, I either set a flash up, or call down one athlete to hold the flash in just the right spot. It's much easier to use athletes rather than clamps and extra gear. Then I visualize where the rider will be in the shot, and find the best way to frame the image. I fire a test shot just to make sure the spotty forest light is not fooling my sensor reading, and correct my settings if they were off.
I yell to the riders letting them know that I am ready, and tell them whether to send one athlete, or go in a line following closely. More riders create a more dynamic and unique image. This is something that most photographers forget when shooting individual sports. Just because it is an individual sport, does not mean that athletes don't ride together, or race each other! With my flash I will only fire one or two shots, and with a lot of practice, I have learned the right timing. Without it I shoot rapid-fire at 8 frames per second. By shooting so fast, I can guarantee that one of the images is the perfect moment!
There are many different ways to capture a shot, even from the same angle. I always try to use many different techniques throughout one shoot. These can include sequencing, zoom pull, pan, horizontal or vertical shots, different zoom lengths, and slow-sync flash. The more techniques you try, the more unique shots you can obtain from similar features.
I move as fast as I can with each location, and generally will not re-shoot a spot, even if the image came out wrong. It just takes too much time to send the riders all the way up to the start of the feature. During this shoot, the weather rolled in dramatically. We finished one run of shooting, and a MASSIVE thunderstorm and pouring rain shut down our operation. I took the crew to a pizza cafe where I captured photos of them eating, refilling drinks, looking out at the rain storm with disappointment, and standing in the doorways. You have to be creative when the elements are working against you! The stock agency is paying good money for a shoot like this, and they will be expecting LOTS of great and different photos. Fortunately, the storm cleared up, and we were able to make one more lap before the mountain closed. When we arrive back at the truck to head home, I like to try and capture a few more riding shots around the truck. These shots will range from wheelies, to splashing through a puddle, and posing with the bikes and gear on.
Even if you cannot find a company to commission a day shoot with you, it is well worth your time to arrange one and practice. Chances are you will capture some of the best shots so far in your career, shots that can help you land day shoots. Cavan Images is a brand new company, and they are looking for more photographers. You can reach them at www.cavanimages.com Just make sure to mention me as a reference!



 Posts
Posts


