Showing posts with label Techniques. Show all posts

Sunday, February 7, 2010

Creating soft and even lighting

In a perfect world, you would set your flash on it's stand, click the button, and soft even light would cover your subject in all it's glory.  No accessories needed.

We don't live in that world...
Image captured with no modification for a harsh, edgy look

Flash accessories will make your photography look more professional.  There are times when you don't necessarily need to use them, but most images could be drastically improved through the use of flash modification.

Saturday, January 9, 2010

Camera Basics 101- Focusing

This is a new series designed to help teach true beginners how to use their cameras.  For this first lesson, I thought that focus would be a great topic.  For more advanced articles, please use the sidebar on the right, or look at previous articles.


Captured with continuous auto-focus mode.


Wednesday, October 14, 2009

Architectural 101


Both of these shots are from last night's shoot.


Architectural photography (In my opinion) is one of the most technical types of photography in existence. Like anything else, it's all about perfect timing, the a colorful sky with a few clouds, and as much flash lighting as possible.  Oh, harsh sunlight can blow the shoot, and you need to run around like a maniac to get your lighting just right and still manage to look professional in front of the client.  No hesitations are allowed here, if you pause to think, nod up and down and move a little every once in a while to make it look like you are not panicking.  The last thing a client wants is a stressed out photographer.  I generally always shoot exteriors/interiors right around sunset.  Not because I'm too lazy to get up early (we all are somedays..)  but because the light just works for me at that time.  If the shot doesn't seem to be working, relax, cause the light will just get better and the moment for the shot will come.

Architectural photography can be very tricky in mountainous areas.  The sun can set hours apart for different houses on the same block.  This occurs if there is a large mountain is present.  Plan ahead.  Arrive early.  Impress the client.  I like to show the occasional (only a few per shoot) image on the back of the camera, and tell them how much better it will look when I'm finished color-correcting it.  Using color-correcting as a term instead of editing can help the client believe that your shots don't even need editing because you are so good.  Capture the shot, grab your stuff, pretend it went well even if you don't think it did, and move along quickly.  Lingering too long instills doubt in the client.  Would you think someone was an expert if they spent 45 minutes capturing one photo of your bedroom?
One thing that really helped my architectural work is actually the post-processing.  You can theoretically light up a large complex room with one flash, thanks to photoshop.  I will angle the flash many directions to cover dark spots, capture an image with each direction, and use quick layer masks to light the whole image evenly.  It takes some practice so you will want to try it in your own home first and perfect the masking art.   Of course, if you do have a lot of flashes, go crazy!  I usually always bounce the flash to avoid unwanted glare, either off the wall behind where I'm shooting, or the ceiling directly above me.  If there isn't anything that will create glare, I sometimes shoot the flash direct.  I use a diffuser box on it to spread it everywhere, and set the flash head as wide as it goes.
Always look for the little details in every room you shoot.  Lights look better on, always light the fire and if you can't, place a flash with a red gel in the fireplace.  I use the LumiQuest FXtra gels for this because they are affordable, and always stay on my flash.  Make sure everything is arranged in a pleasing manner, and make sure your angle truly is the best for that room.  Shooting ultra-wide will work fine, because you can use distortion control in photoshop after and retain straight lines.
There's a million more things to be said about architectural photography, but I feel this is a good start.  Please comment below if you have any questions, and I will be following this up soon with more information.

Wednesday, September 9, 2009

4 hours of mountain biking+sunny day w/ blue skies!= Awesome stock photography


Downhill mountain biking photography can be very challenging. The lifts only run during the worst hours of sunlight (midday), and the shadows of the trees cause very complex and shadowy situations to deal with. My advice for mountain bike photography: Purchase a powerful flash (such as the SB-800 from Nikon), a quantum turbo battery pack (allows for ultra fast flash reloads for multiple shots of one trick), and a set of wireless radio triggers (Mine are Pocketwizards, but I also highly recommend the Alienbees Cybersyncs). Better yet, purchase two of these complete setups! These are very expensive though, and if you are just starting out and a Nikon user, you only need the SB-800 or SB-600, and can control them from your camera's pop-up flash. The flash will have to be line-of-sight, and you will have to time out your shot just right since midday light generally means 1/2 to 1/1 power.
This setup allows you to properly deal with those spotty forest lighting situations. I generally place the flash around 10 feet from the rider, aim it higher than you might think you have to, and set it to 85mm or 105mm zoom for more kick. It appears I've gotten ahead of myself though, and must now backtrack to the start of the whole process... First off, you need a talented mountain biker that is willing to stop repeatedly, and climb back up the trail for multiple attempts. Before shooting with said biker, you must build up a good rapport as this will make the whole process a lot easier, and make them more comfortable with having a camera in their face all the time like paparazzi.
From there, I choose to ride ahead of the model/rider, and scout the best locations for my vision. I find that although knowing a trail in advance can help you get to locations faster, if you don't know it all you won't overlook certain parts of the trail. This, in turn, leads to great shots that had you known the trail, may have never come into being. Once I have found something that may work, I have the rider roll through it once to become familiar with it, and so that I will know the best spot to setup my shot. I then setup my flash like I discussed above and have the rider stand on the corner for a quick test shot. At this point I can adjust all my camera settings and make sure everything is just right! Usually a shutter of 1/250th to avoid high speed sync, an aperture right around f/7.1 to ensure the sharpest image possible and keep highlights from washing out, and an ISO of 200. These are only rough guidelines, but the aperture is usually the only thing I change.
The rider climbs back up for the shot and yells when ready. I confirm my focus (almost always pre-focus on the key spot), and the rider hits the feature. Sometimes things will go wrong, or you will be disappointed with the results. If this happens, show the rider the image, and ask if they are willing to hit the feature again. Don't get too hung up on it if they aren't interested in making that climb back to the top again, you will have plenty more opportunities in other locations.
My best advice for a stock shoot like this: SHOOT EVERYTHING THAT HAPPENS!! From when the rider is unloading the bike off the car, lunch time, riding the gondola, staring into the distance while they wait for you to finish setting up on a berm. Shoot anything and everything that happens. You will be surprised by the resulting images. Always remember that when shooting any sport or activity, there is more than just the action that makes that sport mean so much to people.
Above are some shots that I captured from this short day of photography. If you have any questions please contact me at info@cnwphoto.com, or comment below this post. I am trying to create a strong following on this blog so if you enjoy my posts, please add yourself as a follower!

Monday, July 20, 2009

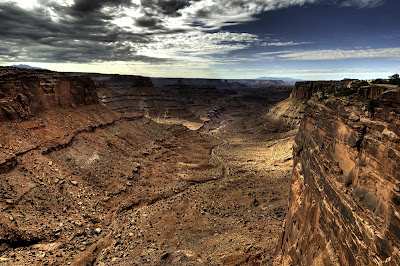
HDR- Why? How?


I've been hearing a LOT about HDR imagery lately. It's easy to look at a lot of photographers HDR work and not take it seriously because of how edited and fake it looks.

The truth of the matter though, is that HDR allows a photographer to show the world exactly as their eyes see it. A camera can only capture a very small range of light, causing some areas to be too dark, when exposed for the bright areas, and bright areas to become whited out when exposed for the dark areas. Unlike your eyes, camera technology does not allow for a huge range.

It is possible to create a very realistic image with extremely high dynamic range, in post-processing. Thanks to these new technologies, I was able to capture the HUGE range of the varying light cast in Canyonlands, UT. To capture a shot like this you first need to bracket your exposure. Most cameras will have this bracketing option. I will usually set my camera to a 7 image bracket, this way I have lots of range to work with. You must also use a tripod and make sure it is very steady. I use a remote to trigger the camera to guarantee no shake between images. Be sure to keep the same aperture and ISO throughout all exposures, and only vary the shutter speed.
Once the photos have been captured, the magic begins. I first do my RAW adjustments to the best looking exposure from the seven I captured. Then, using lightroom, I sync those adjustments with all of the other images. The program that I prefer for an HDR merge is called photomatix. This program works Significantly better than photoshops "merge to HDR" feature. It also comes with a plug-in that allows me to select my exposures and use lightroom's "export" feature to change the file types to TIF's and perform the merge through Photomatix. After the program has worked its way through the files, it should automatically open the "tone-mapping" dialog within photomatix. Don't be scared when the image opens and looks terrible. This is just what the program has created with it's auto adjustments. The biggest change that will determine if the image looks real or like a painting, is called "light-smoothing." I usually choose the 2nd button from the right to create a real image with a very large range. The farther left you go, the more the image will look surreal and like a painting. I also adjust "highlight and shadow smoothing", and "strength." The adjustments I make will vary depending on the image. There is a default button on the bottom, so if the adjustments you have made are making the image worse, you can always click that and start over.
From there, I will save the final file, and open it in photoshop CS4. These adjustments will also vary depending on image, but I will usually perform a curves adjustment, sharpen the image, and apply the image in Lab Color mode as discussed in my post below.
Get out there and make the ordinary look extraordinary with HDR!!

Sunday, July 12, 2009

Make your photos *pop* like the pro's do!


Photo After Lab Conversion

Photo Before Lab conversion


This is a very easy technique to do using most versions of photoshop. This is always my second to last step when editing a photo, with sharpening being the final one.

First you will need to convert your images color mode, to do this select "image" from the top bar, "mode" from the drop-down menu, and choose "lab". This converts all the colors of the image, to the lab mode. Then choose "image" again from the top bar, and click on "apply image". Don't worry when your image changes to very dark colors that may not look great. In the window that pops open, choose "soft light" under blending mode. The image may look way over-saturated now, if so go into the percentage box below, and choose a number that makes the image pop the amount you would like. For me the magic number is usually 40-45%. When you have found an amount that works for you, click OK. For most applications you will need to convert back to RGB format now. You can do this by clicking "image", then "Mode", and selecting RGB. The image is now ready for final sharpening, and should have a much stronger, more saturated, *pop* look! This technique is one that completely changed my editing as a photographer. All of the sudden I was getting far more compliments on my imagery. Everyone who I normally had shown my photos too, was blown away by the quality and style my images now had! Enjoy!