
Capturing architecture seems like it would be incredibly hard. The area you have to light is very large, and the shot should be technically perfect. With a few little things to remember, you will be well on your way to capturing great images. So here's some advice for approaching a shot like this. And remember, practice makes perfect, your first attempt might not come out very good.
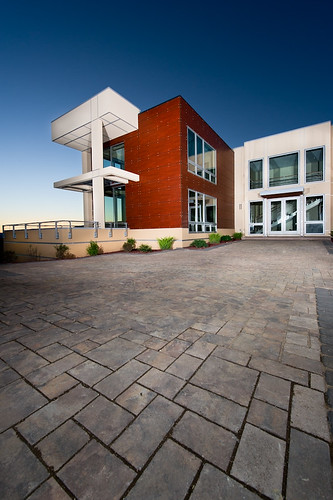
When setting up for a shot like this, I will first always scout the location. If you don't know what your shooting, how can you expect to show up at sunset and create a great image in a matter of minutes? Determine whether the shot will look best at sunset or sunrise. (It sucks and no it isn't fair, but sometimes shots actually do look best at sunrise....) So good morning sleepy eyes! Lucky for me, this was one of the shots that looked best after sunset.
It's easy to forget that the light is often best 10 minutes after the sun disappears over the horizon. I would know this because I do it all the time... I'll show up and start shooting too early, and become frustrated that the shots aren't looking great. Don't let this happen to you! This shot worked best at sunset because the front of the house would have odd shadows in the morning, and no light on it until about an hour after sunrise. Because it faces to the west, I knew I would get a great looking gradient in the sky after sunset.
Now that I know the shot is after sunset, I will want to bring flashes to light up the property. This is where it starts to get interesting! If you don't have a good set of flashes, AlienBees is a great place to start. With their (comparably) affordable power packs and flash heads, and great power output, they work incredibly well for architecture. You can get a 2 flash setup with a power-pack for under $800!
For this image, I started by building up my big flashes. I used 2 AlienBee B1600's triggered by pocketwizards wireless radios. One flash was setup to my right, and aimed toward the entryway of the house. This one was set at 1/2 power and had a 70mm flash output modifier to extend it more into the area. The other flash was set at 1/4 power to my left, and was aimed directly at the corner of the house. I knew that this combination would spread the light evenly, and cover the majority of the house.
From there, I added a Nikon SB-900 directly in the middle of the courtyard area, and in the shot at 1/2 power. This was the best way to light the bushes, and I knew that with a slight clone stamp afterwards, I would be able to remove the flash from the image.
The final flash was a Nikon SB-800 that I held above the camera, and zoomed to 14mm wide. I aimed it slightly forward and used it as fill for the driveway.
That's my setup. The camera was set by spot-metering the sky, and checking a test exposure on the screen. My camera settings were as follows: ISO 200, f/11, at 1/80th of a second.
Post-processing helped bring the image together with some Dodge/burning, clone stamping, LAB color corrections, and lens correction. Plus a couple selective area curves adjustments for contrast. With a final Smart Sharpen to finish it off.
That's the BUZZ for Today! Please check back soon for more.


0 comments:
Post a Comment