
Luckily for me, my friend has some serious talent and can actually dunk! Exactly what I was hoping to capture!

My plan? Bring all the lights I've got and build the shot from the ground up, 1 flash at a time. I captured the shot I had in mind, and then went on to capture an even more exciting and unique image. I was hoping to get on location earlier, but there was a holdup with the athlete and we had to head out later. That's ok though, no dramatic blue sky, just dark!
The darkness made focusing a serious issue. There are no lights near the park, and some cloud cover was blocking the moon. The trick I've learned is to have the athlete stand still and shine his phone (or mine) on himself or an object near where he will be to lock in single auto-focus. Then I flip it to manual and fire away.
I brought my softbox as a main fill light to help secure a more even lighting. It's best to have no harsh shadows anywhere on the athlete, otherwise it's a very distracting element. The softbox was placed about 8 feet high to help light up the athletes face more, and was feathered up a bit to not contaminate the court with light.
Then, I placed another flash that was bare to the left and behind the athlete, and yet another one on the other side. I could have built in more flashes, but this seemed to be a good starting point. The images were looking pretty good, but that's not good enough! I brought out my AlienBees ring flash and held it just below my lens feathered upwards. This was to eliminate more shadows that the softbox seemed to be missing. If your ever really struggling with shadows, don't be afraid to bring out the ring light! Plus the AlienBees ring light is only about $400.
Once the lighting was good, it was all about coordinating with the athlete. If you've ever watched a Joe McNally video you'll notice that he spends more time coordinating the model/athletes position than setting up the flashes. Without great material, great lighting will only get other photographers excited. Most people look at a photo with great lighting, but bad content and could care less. Keep this in mind always!
I had the athlete move more to the left, and jump earlier to get his body isolated from the hoop. Showing him images along the way so I could really demonstrate what would look better made for great results. Work closely with talent and you can achieve the look you desire. I also worked with him on arm placement and pulling his legs up more to make the jump more dynamic. It was great working with such a talented athlete.
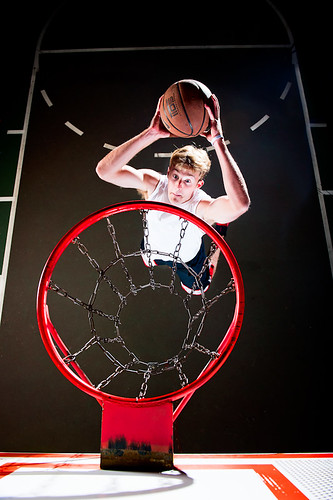
Once he'd nailed the jump, and I'd nailed the shot, it was time to get crazy. I headed over to my backpack to grab my tele lens, but noticed something on the way... The pad on the hoops post looked perfect for climbing up. Without saying a word I set my camera down, and walked over to see if I could get above the backboard. I probably looked like a crazy person as I charged up the hoop and hung off the bottom like a monkey until I made it on the top. The post was at a right angle and stuck out about 5 feet from where it started. This made for some seriously shaky, wobbly business. Oh well, I've been in crazier positions than this. Pass the camera up and lets get this shot!
I'd envisioned climbing up and down about 5 times to get the flashes right, but figured I should take a test and see how the pre-existing light looked. The athlete passed up the camera and I had him do a test dunk to see the light quality.
Turns out it was PERFECT. Nice and 3D looking light with perfect fill on the athlete. I had turned off the ring light before heading up because I figured I couldn't hold it while wobbling. (Note: Sketchy situations like this call for placing the camera strap around your neck. It's not lame if it will actually save your gear!)
My athlete adjusted down the softbox a bit and with a quick aperture adjustment the shot was ready. All in all we took about 30 shots from on top of the hoop until I felt we had the perfect image. Through lots of communication with the athlete we managed to get the jump from the right spot without blocking his face with the rim. Awesome!
I can't stress enough how important working closely with the athlete/model is. This is where many photographers move on to be professionals. When they quit heading to the park and taking pictures of random people, and start arranging their own shoots. (Of course you can't do this if your an event photographer but that's a different story.) Work with friends at first and figure out the best approach to make images work.
Gotta love great photo shoots with some excitement!


0 comments:
Post a Comment