
It's always important to have a backup for your camera and flash, should something really go wrong. My main rig is a Nikon D3s, but I held onto my D300 as a backup just in case. Every shoot I go to, I place this is a separate bag and keep it in my car. Before that, I shot the D300 with a D200 as a backup. One day, my D300's CF door latch broke, and I couldn't get the card out to replace it. The D200 saved me, and gave me something to shoot while the 300 was in for repairs. You just never know what may happen in the field. Being over-prepared is always better than just taking what you think you'll need.
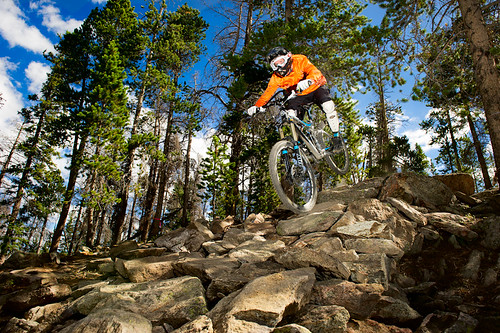
For this shoot, Winter Park was looking for lots of action shots showcasing new features on their trails. If your into downhill biking and like to hit jumps, WP is the place to be! The mountain is now littered with tons of HUGE berms and large fast jumps.
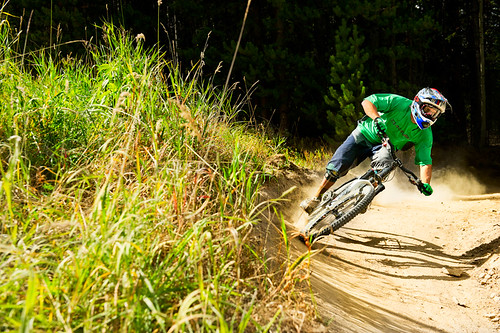
Since the shoot was scheduled for mid day, I knew I would need to bring a couple flashes to try and make the rider pop out of the spotty forest lighting. For these conditions I typically like to set my camera in Shutter-priority mode (gotta keep it around 1/320th to avoid blur) and under expose by about -0.7. This makes the forest darker, and also helps reduce the overly bright light shining through. From there I mix in flashes that I trigger via pocket-wizards. The flashes are aimed to keep the lighting on the athlete even and make them stick out from the surroundings.
Sometimes you can get away with great shots by using the spots where the light is shining through. If you have an area that's wide enough, choose an angle where the background is dark, and spot meter on the area you want to shoot. This will keep your athlete even, and lower the lighting behind them. Don't lower your compensation when using spot metering like this.
Back to the flash rigs. For tripods, I use a cheap ($20) wal-mart tripod with tilting head and independently adjustable legs. The legs are very important because almost all flash stands are made for perfectly level ground and cannot be adjusted. For $20 you can get a stand from wal-mart with adjustable legs that is more than stable enough for a flash or two. Just thread your flashes baseplate onto the tripod mount and your good to go!
The other device that I used costs about $2 and can be purchased at your local hardware store. It's a round bungee strap with a plastic ball on one end. Just wrap the strap around the flash and a tree or branch, and pop the ball through the other end. Instant flash stand that costs and weighs almost nothing! Plus, it lets you place your flash in higher areas for different lighting effects.
Between the two of these I'm set to conquer whatever the woods have for me. This shoot involved 3 different models and the resort was looking for some shots that would show the multiple athletes at the same time. This is where it get's tricky!
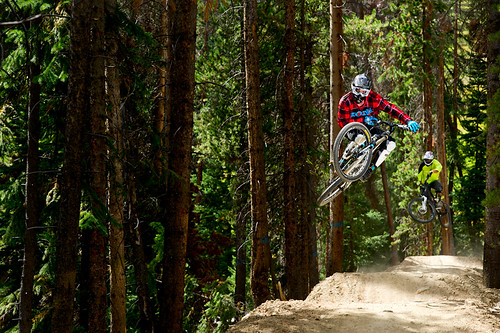
Knowing that there would be two athletes in spotty forest lighting, I needed 2 flashes to make sure that they would stand out from the background. For these shots I used the athletes to build in the flashes by having them stand where they should be in the shot. First, I set up one flash on the farthest back athlete, and took several test shots until the lighting looked right, and had the perfect amount of *pop*. Then, I went ahead and set up the other flash from a similar angle (keeps the lighting more natural) on the closest athlete to get the right lighting on them.
The key for these shots was to have the athletes hit the jumps a certain way to ensure that both could easily be seen in the frame. Since the jumps were so wide, I could have them go off the right or left sides to separate them. Once I was all setup, it came down to timing, and my focus. For jumping shots, I typically choose a point near the landing, and pre-set focus with single auto mode. I then swap to manual to lock in the setting.
I help the athletes figure out the distance they should be apart, but since these were pros they could nail it the first time with no instruction. When this type of shot works, you really create something unique and exciting! Few photographers are capturing more than one athlete with flash like this. Another note: set the back flash a little lower, you want the athlete closest to the camera to pop more.
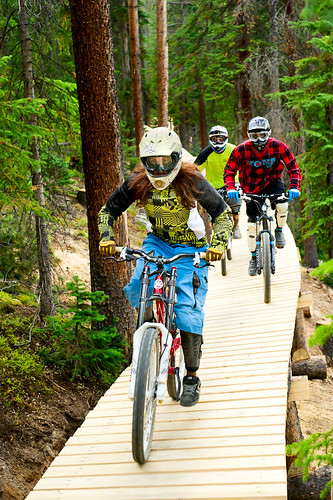
When it came to shots involving three athletes, I typically avoided the flash and tried to capture them out of the forest. This makes the shot look clean and keeps all riders evenly lit. Stock photography tip: shoot multiple athletes, it's easy to shoot just one and that's why the agencies are already pretty saturated with single athlete shots. Add in a rider or two more and suddenly your shots are edging out the competition and look extremely dynamic and exciting.

For the shot above, I decided to mess around with motion blur. This is an area that I've never played too much with, but thought it could make it more dynamic. I set the camera to 1/40second shutter speed and exposed for the outdoors. This put my aperture around f/20 with an ISO of 100. f/20 requires a LOT of flash power, so I cranked both flashes to full power and fired them side-by-side.
As always, on a shoot like this, I cannot stress enough the importance of listening to your athletes. They tend to know the mountain better then you, and often have several ideas in mind for shots. Listen to them and you will get better shots. If you know it won't look good though, tell them why and move away from it. Don't waste time on shots you know will be bad.
It helped that we had the mountain all to ourselves, but typically you'll have other riders coming through. Setup everything (including yourself) in locations that are off the trail. If you have to be on trail, face up trail (head-on shot) and be prepared to jump off when other riders are coming.
Another great shoot and everything went well (aside from a few blurry shots, damn sync limitations....) What more can you ask for?! If you have any tips that you would like to add from your own personal experience, please feel free to add them in the comments below.
Thanks to Winter Park, Willy Warren, Nick Simcik, and Angela for making this shoot possible, I look forward to more shoots at Winter Park!
That's the BUZZ for Today! Please check back soon for more.


0 comments:
Post a Comment